|
How to install |
|
 |
|
 |
 |
How to install "DURAWALL"
- Measuring
- Measure the area to be covered accurately, and calculate the number of rolls you need.
- Prepare walls
- Remove picture hooks, light fixtures, switch plates.
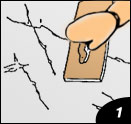
- Fill cracks and holes with spacking compound, then sand smooth. (PIC #1)
- The wall must be thoroughly dry, clean and smooth before start of any work.
- Use a plumb line
- Choose an inconspicuous corner, such as behind a door, to start your work.
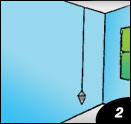
- from this starting point, measure the width of your wallcovering strip, minus 0.5". Tack a piece of string at this measurement just below the ceiling, and tie a plumb to the string just above the floor line. (pic #2)
- When the plumb stops swaying, lightly mark the wll with a pencil about 2" above the baseboard. Remove the plumb (but not the string).
- Rub the string with any colored chalk and hold it tight against the wall at the baseboard. Give the string a quick snap. The chalk line on the wall is your guide for positioning your first wallcovering strip in order to ensure the true vertical line from ceiling to floor.
- Strike a plumb line on each new wall before hanging strips.
- Cut and match
- Measure the wall from top to bottom in several spots. Add 4" extra for trimming at ceiling and baseboard. Cut a wallcovering strip to that length.
- Roll out the second strip alongside the first, be careful to check for pattern match. Repeat this procedure in cutting the rest of the strips. be sure to mark The priority of each strip.
- Prepare wallcovering
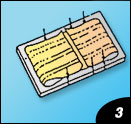
- Roll out the wallcovering strip, pattern side down. apply the paste with a wide brush or roller to the top half of the strip, working from the center to the edge by leaving approx. 1-1.5" of both left and right edges unpasted until you cover all areas. (PIC #3)
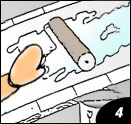
- loosely fold the pasted half of the strip toward the center, wet side to wet, without creasing. repeat the procedure for the lower half of the strip. (PIC #4)
- Hanging the first strip
- Apply the strip to the wall in line with the plumb mark, leaving a 2" overlap at the ceiling joint.
- Use a damp sponge or smoothing brush, stroke the top half of the strip to the wall and smooth outward from the center toward the edges until all wrinkles and air bubbles are removed.
- Unroll the lower half and repeat the smoothing procedure. sponge down each strip with clean water to remove any excess adhesive.
- Butt strips (butting means fitting the edges together without any overlap).
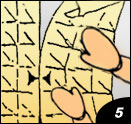
- Hang the second strip of wallcovering the same way as the first, carefully matching and butting it to the first. Use the edge of the first strip as a vertical guide. (PIC #5)
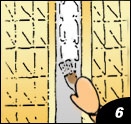
- Apply the latex glue (water soluble glue) to the wall at the seaming area of both strips, and stick the edge of both strips to the wall. (PIC #6)
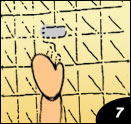
- Roll the edges with a seam roller to ensure adhesion and a tight seam. (PIC #7) (when the seams have leaking out of adhesive, be sure to clean it off for avoiding the seams become yellowish).
- All non-matched patterns (grasses, burlaps, etc.) should be hung reversing the hanging of every other strip, to give a natural color feel. (PIC #8)
- Trim the strips at ceiling and baseboard with a razor knife and steel rulerm. do not lift the blade. use the steel ruler as a guide for a straight, clean trim.
- Rounding corners
- FOR the inside corner, measure from the edge of your last hung strip to the corner at the ceiling, middle and baseboard. Add 0.5" to the widest measurement. Cut this width from a new strip, saving the remainder. Hang the cut strip as usual, extending 0.5" around the corner to the next wall. establish a plumb line for the remainder strip on the new wall hang the remainder strip, overlapping 0.5" of the previous strip.
- Outside corner can be wrapped with a full strip. Aligh with the preceeding strip and fold around the corner.
Remark : The above installation guides should be performed by a wallcovering professional in order to obtain the maximum performance and satisfaction.
|
 |
 |
 |
 |
|
|